31 October 2012

3rd anniversary - 9th and last day

Day 8 giveaway winner is Ineke

I am calling today's post "The Wrap-up". This has been fun for me and I have actually enjoyed trying to think of 9 interesting posts to go along with my 3rd blog anniversary. 
Sandy was an unexpected visitor but here in Maine it was a non-event. We are used to astronomically high tides in conjunction with high winds. The rain did pound down but it was during the night so we slept through most of it. 
This will be a potpourri of odd bits. I had a lot of comments on my "Bread Fruit" green walls. Most of the house is "Pea Soup" green. This is my upstairs bathroom. The house was built in the 1880's and there were no bathrooms. The current upstairs bathroom was a bedroom so it fairly large, about 10  X 12. It was the original olive room. When I was trying to figure out what color to paint the living room I was flummoxed. I told my brother, "All I know is I love that olive green bathroom" and so it went. 


One of my earliest pieces


The gallery wall


The back wall of my shower.


This is the mini-version of Winter Marsh I did for the class trimmed and ready to frame


When I get better at this, I will do a tutorial. I made too many mistakes and didn't take photos either.


I was looking for a heavier frame and I had some scraps of trimmed wood my neighbor gave me so I beveled the edges and glued it up


In "Pony" clamps


Finished


All cleaned up and ready for a new project


The new project will be a new purse with room for my watercolor book.


This is a wallet I have had for over 20 years. I can't seem to find a replacement. One of my sketchbooks is under it.


This is a sheet of packing paper I am using to "draw out" the plans for the new purse. The fabric above is what I am thinking of using. Hopefully I will have this done by Friday. And finally...

It is amazing what you will see and who you may "meet" in the blogisphere. I have become very well acquainted with many of you reading this and you have made by experiences and life much richer. Thank you for reading my blog posts, commenting and to many of you for becoming friends. See you Friday!

Leave a comment for this last giveaway.


If you aren't interested in the fabric per se, you can shibori it again in another color, over dye it or do any experiments you might find interesting and share it with us.


30 October 2012

3rd Anniversary giveaway Day 8

I forgot to add the giveaway for today. This is it.


Leave a comment to win the last giveaway - the shibori fabric.


The day 7 giveaway winner is Christina

One of the best parts of having lots of people comment on my blog is getting to visit their blogs as well. I have met so many wonderful quilt artists from the Netherlands and one I just recently "met" is Ann Vanherle whose blog "Piece by Piece" is inspirational. While perusing her blog I came upon a post in which she talks about a stamp. She looked up the meaning of this stamp in a book. It is an Adinkra symbol from West Africa. 
For some reason I was so intrigued with this stamp that I also did a bit of research on this symbol and this is what I found.


GYE NYAME

"except for God

One of the website I checked out had this written about this symbol. "This African representation that nothing happens in life without the presence of God. There is nothing except God, omnipotent and omniscient. Always in one's life."
I like that. I decided to make my own Gye Nyame stamp using three different methods. I thought about carving it out of my E-Z Kut but since there really isn't any detail in the shape I decided to try 3 other materials: a sponge, a Styrofoam meat tray, and a homemade screen.

This is what happened


I bought this strange sponge at the dollar store. When dry, it is so HARD, you could drive nails with it. When wet it is very dense and doesn't work very well. Since I paid a dollar for it, I kept it and figured something would come up. I decided to reconstitute it in warm water which took a very long time. I wrung it out and used a fibertip to make the outline of the stamp which I had printed on copier paper and cut out.


I had to let it dry because I wanted it to be in it's hardened state when I used it


This is the dried sponge stamp glued with Elmer's contact cement onto fiber board from you know where ($)


Then I cut two rectangles from this very thick foam meat tray


I used another smaller version of the stamp which I covered with tape to 1. adhere it to the foam and 2. protect the paper surface from tearing when I pressed the ballpoint pen into the image to make the indentation in the foam. You can see the grove I made.


I used an X-acto knife to cut out the image and used the Elmer's contact cement again to adhere the foam image to a backing


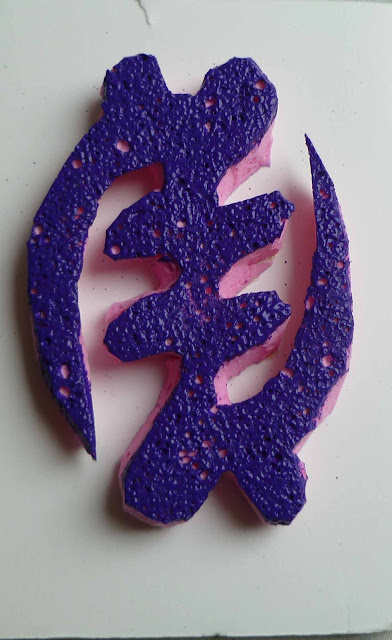
Here I am using the sponge pouncer (Walmart) with Violet ProFab fabric paint from ProChemical and Dye onto the Styrofoam stamp. The sponge stamp is drying.


Loaded

You can see every accidental dent I made in the Styrofoam with the knife


Next I took the image I had covered in tape and taped it to a piece of freezer paper and cut out the image with the X-acto knife.


I removed the taped image and trimmed the stencil to the size of this blank  screen


I made this screen by cutting a mat like frame from a piece of cardboard. I put down a piece of window sheer and taped it to the cardboard "frame" with duck tape creating a mini blank "silk screen".


I ironed the freezer paper to the screen. I tried an iron but ended up using a mini-iron

I used electrical tape (from $ store) and covered the edges so no paint would get around the edges of the screen


Ready to go


I loaded up a credit type card (hard plastic) and used it to screen the fabric paint over the screen. Screen side up; paper side down.

The screen and the two prints from the screen UR and LL


Now I used the pouncer to load the dried sponge


Not bad. Kind of organic and interesting


All of the printed images. The screen had a small tear in the paper - rats.

I don't think I've seen the last of this symbol. There were many other Adinkra symbols and I will be exploring them and their meanings. 


29 October 2012

3rd Anniversary Giveaway Day 7

Day 6 giveaway winner is Gill

Finally the framed "Winter Marsh" (working name Woodland Frost).
All five of last weeks blog post were done on Sunday while I was waiting for the lumber yard to open on Monday. I did get the materials delivered and framed the quilt but had to wait til the five posts were finished.
This piece started as a sketch, then cotton was dyed. I used improvisational piecing to create the horizontals then sliced through the finished piece to create the verticals.  After the image was pieced I laid it out on a huge piece of synthetic felt and quilted it to death.
Now I am ready to frame the quilt using this first framing method.


Winter Marsh fully quilted and smoothed flat on my rug


The back of the Styrofoam on the front of the quilt. One on top of the other with both right sides up


 After being assured the foam was the correct dimension, I traced around the edges of the foam then used that lines to cut away the excess. I cut right ON the line because I like to stretch the quilt a bit as I pin it.


This is an eraser pen I picked up at Joanns. The pink end marks and the white end has a liquid that erases. I didn't erase, just cut on the line.


All trimmed to size


I forgot to show the quilt face down and the step where I spray the back (felt side) with a light temporary fabric adhesive. The Styrofoam is chemically touchy so I try to be "light" with the spray adhesive and only spray it on the cloth. 505 is a good choice. Once the quilt is on the foam and centered perfectly, I smooth it down firmly starting in the center (see tutorial above) then start the pinning.


All pinned and ready to frame


Framed, from across the room, with my faithful (plastic) crow keeping vigil.


A close-up. OK, we have already established that I love olive green. This particular color is called "Bread Fruit" which I learned was a plant in Hawaii. The green on the left wall is called "Pea Soup". LOVE it.

* Another note. Remember the 8th day giveaway that I forgot. Well it turns out I didn't forget to have one, just forgot to add it to the list (pictures) of the giveaways so I am adding it on as today's giveaway. I think you will like it.


Still to come: two more days of giveaways (Tuesday and Wednesday)


27 October 2012

Fridays Winner

The winner of Fridays Day 6 Giveaway is Gill.

Comeback Monday for Day 7 of the 3rd Blog Anniversary Giveaways. Next week we have 3 more giveaways and 3 new blog posts.

26 October 2012

3rd Anniversary Giveaway Day 6

Winner of Giveaway 5 is Carmina

and some Poly-morphing....

I am one of the originators of "And the we set it on fire" blog. Did you see us in this month's Quilting Arts Magazine? Anyway, this month. Nienke Smit, from the Netherlands who I was fortunate enough to meet through my sewsewart blog, was the presenter for the month of October. She was asked to join the "Fire" blog and has been a fabulous addition. In her blog technique, she talked about creating texture on polyester fabrics.
I gave it a try on some polyester organza and the again on some heavy polyester satin to see if the shape change would hold up even on a heavy fabric. I used the same buttons on this piece and thought I'd try sprinkling paint on after it had dried. This is what I got.


The same button tied inside


And here is the satin after drying. The shape held beautifully.     


with brown silk paint that ran along the grain of the fabric (rats)


With Halo Green Gold (jacquard) in the shade

and in the sun

and with some Seta-Color dark green.

This technique could be useful in doing a 3-D piece.

Giveway #6

Leave a comment for an opportunity to win this DVD.