29 August 2013

English Paper Piecing Tutorial Videos

One of the women  who reads this blog (Minka) was kind enough to send me a link to 3 fabulous EPP tutorial videos. The were so clear and easy to follow that I want to pass them on to you.
Please check out Mink's blog as well as the tutorials.


  • Excellent hexagon demos by Jackie Wills

27 August 2013

Needle book

You may remember my dear friend Judith, my creative buddy who I play with all the time and co-creator of the FIRE blog. Well, when I went to Ohio to take the Dorothy Caldwell workshop, I stayed with Judith's daughter, son-in-law and three grandchildren, whom I had never met before. Just corresponding with her daughter, Ellen, in the weeks before the Ohio workshop, I had this feeling, she would be as nice as Judith.
I was right and we've kept in touch, shared email with photos of our projects and just gabbed. She is so lovely!!
Well, this past weekend, she and her daughter did a sewing project which Ellen said was a secret until done and that she would send photos Monday. I know they have been doing their own EPP project and I had gotten photo updates but this project was a "stash buster". She sent photos of the cutest needle books they had made from scraps and she was sending me one with love and positive energy stitched into it.


I love this not only because it is in my favorite colors, and very useful for my yet to arrive "straw needles" but the love that it holds will come with me in my basket to all my upcoming chemo and radiation appointments.

Thank you Ellen and Abby for your sweet thoughtful gift!!

22 August 2013

More Tutorials


I watched another tutorial the other day, another one of Sue Daley's, and the first in her series of 6. One thing which was enormously helpful was her choice of needles. She recommends millinery needles Size 11 also referred to as Straw Needles. I am using hand dyed fabric with a high thread count (for the most part) and trying to pierce the fabric with a needle is the hardest part of the process. These are very fine needles, like hairs, and I managed to find them, even her brand, on Ebay here. I bought two tubes and the shipping stayed the same price. I am really looking forward to these thin needles.

20 August 2013

EPP is not a "flashy" subject

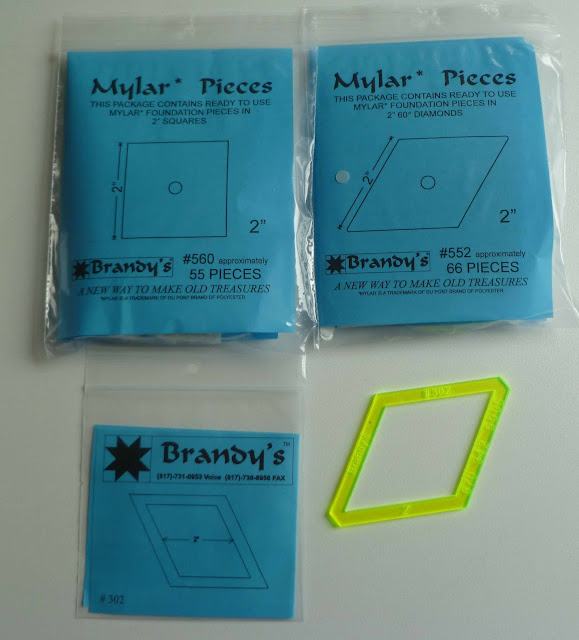
Learning to EPP has been a slow process. In the beginning it seemed that the Mylar pieces were the way to go and they are certainly reusable and very durable, easy to "clip" the pieces together for whip stitching and they keep their shape. I have never used paper shapes but I have been watching Sue Daley's tutorial and she can really whip down those seams. 
I have not found it easy at all to catch threads to stitch because the Mylar is so thick it keeps the needle from lifting the edge of the fabric. Because of recent events, I have not needed the project immediately, so I am going to try actual paper. I was going to find a pattern and cut them myself from card. Then I found a site which sells 400 for $19. I think I would actually pay someone to cut out 400 diamonds for me so I ordered them. I may just get one use or perhaps two but If I can get better speed, I think I won't feel so frustrated. 
Here is where I am so far:


I have no idea if this is the way these blocks and rows are joined but this is what I am doing


I just pushed the last row down so you can see what it will look like when sewn.


Here is one straw needle in my book. It doesn't actually look that thin because there is nothing to compare it to.


This is the needle in a close up. The thread which looks like cord is actually Bottom Line Thread from Superior - one of the thinnest threads I know of. It is size 60, whisper thin and it looks fat in this picture. Did you notice to eye of the needle? Even Bottom Line is VERY hard to get into that eye. Once threaded, these straw needles are amazing and worth the threading effort.


On a personal note (which you can skip):
The stitches used for my port-a-cath have become infected requiring three trips to have them removed leaving deep holes. The chemo has been postponed because the infection can worsen after compromising my immune system. My dad went into the emergency room and died a few days later and my mother with deep dementia who lives with me is living alone in their apartment on my first floor because we can't find an opening in a home. Mega-stressful. It is a one-day-at-a-time, one foot in front of the other type of situation. Breast cancer has now become my smallest problem. Hopefully we can get her into a care facility that can handle her situation better than I.


15 August 2013

All bets are in (or is that all colors?)

These are all the remaining colors of fabric I intend (so far) to use in this piece.


It has taken two days of (sporadic) work to cut these into pieces. I can't stand for hours so I brought my chair up and took what was cut, between 3 and 6 layers of fabric strips cut into pieces and then separate them (while sitting)  into individual pieces. Above is  a stack of Nienke's fabric.


Meanwhile, my second order from Brandy's came including the 60 degree diamond Plexiglas template - Hoorah!!


Works like a dream


I also decided to increase the size of the 2.5" square to 2.75". It makes it much easier to fold over the Mylar piece and stitch.


This is all the fabric cut and separated into individual fabric pieces - unmixed


Here they are after somewhat thorough mixing


And this is what I stitched this evening while watching Masterpiece Theater 


I think I like the mix of hues much better

13 August 2013

On to stitching a 4 "piece" block

It's hard to figure our the correct terms for EPP. I am assuming that all the pieces required to make one unit is called a block. These look a bit like stingrays.


I decided to stitch up two blocks and see how they looked.


Here are 2 of the green hued "blocks"


So now after putting 2 blocks together I decided/realized that I don't like the "greens" together. All I have cut into pieces so far are the green pieces. I have now decided to cut ALL the fabric (OH NO!!) into pieces and seeing how they look together.

08 August 2013

Now I'm in the groove!

As I mentioned last post, I made quite a few of these while watching Netflix. I think I would like to take the stitched pieces to my chemo and radiation appointments and just concentrate on the whip stitching of the seams. This may change since I have #1 - no idea what I am doing yet and #2 find I am frequently wrong. (smile)


This is the pile of pieces I did last night. I'm not sure how many over what period of time but tonight I will pay more attention.. I am going to keep the sewn pieces only in this box. I stuck the other stuff in just for a photo op. 
As you can see, I put the four magnets on the tin top and I am trying something new - tiny bulldog clips.


So far I have only photographed them but not tried to sew with them on. More about this "idea" next post.


This is the basket filled with pieces that I cut from another post. I put the "naked" plastic pieces in 2 Italian Ices cups. Above the cups is my thraed and a threaded needle. I also popped my tiny scissors into one of the Ices cups for easy location. I just kept the basket on my lap and learned two more lessons. Lesson 7- When you are sewing, you hands can't put food in your mouth. Good to know since I have to lose about 50 lbs. Lesson 8 - When you have a basket on your lap, it makes it MUCH more difficult to get up looking for food (smile).


I also realized, I wasn't sure how the pieces went together so I took a photo of the part of the book with the "answer". I will print this and keep it in the basket!!

06 August 2013

More lessons to learn

I've been "talking" so much and showing so many lovely pictures it might have escaped your attention that I have up until now not created one single sewn quilt piece. It did to me so I set about to create my first piece. I wonder if these are called "blocks" even though they are small??? A question for another day


This little prepared piece looks so sweet and innocent sitting on the table but lurking behind it were A LOT of lessons.... (see how raggedy the edges look? hehe)


This was the first lesson (actually lesson 4 in the process). DO NOT push the paper clips all the way onto the pattern piece. Why, you ask?Well, first (lesson 4) the thread will catch on the hook of the paper clip. Next (lesson 5) when you try to pull the paperclip off, the blunt end of the hook will want to pull the fabric you JUST SEWED off the pattern piece.


Lesson 6 - The are 2 ends to a paper clip, one longer than the other. Always have the LONG end of the paper clip on the fabric side and the short end on the plastic side facing you. Why, you ask? The short side will not have to be pushed on so far but the long end can provide a great grip helping it stay in place while sewing. I did find it easier to remove the paper clip that was between what was sewn and what I was sewing.  I found the paper clip hanging out the right side got in the way of my stitching. And now on the stitch.


I started the tacking process on the lower right side. I took stiff thread in white (easier to thread with stiff thread and the color will not be confused with the whipstitched seams later on)  I took 2 back stitches.


I rotated the piece clockwise and tacked the next corner with 2 back stitches. You see how the thread went over the paper clip. On this one I still sometimes caught the thread while trying to remove it but even more frustrating was the paper clip was getting in my way while I was trying to get the corner held tightly with my left thumb nail.


I continued around the piece until I had all four corners


I tied off at the fourth corner. I did not stitch back to the beginning (why do it). All four corners were secured. It saved me another stitch to make and later remove and it saved me thread.


Here are the first 2 actual pieces I stitched on to the plastic piece. They look so innocent but it probably took me a half hour to do them. Later that night, while watching Netflix, I stitched a bunch of them lickity-split!! Oh no, my age is showing!!!!

01 August 2013

Onward...

I always have liked a new challenge and with this EPP project, I am learning lessons (code for made many mistakes). I want to include this note before I go on. On Brandy's website, there are no online payment options but there is an order form with a phone number. I placed both of my orders with Brandy's husband, Charlie. Very nice people!! FYI the phone number is 870-342-5005.

When I say I am coming to this project with complete ignorance I am not overstating the point!!!  Let me tell you about it.


The entire thought process behind starting a "hand pieced" project was that it would be not only portable, but slow and contemplative and would require very little stamina to complete. Now, I am a "fast,fast, fast" girl and slowing down has proven to be a intentional learning process. When I try fast, I have to go back to remembering that in this case, slow will win the race (smile)


 These are some of the items I am putting in the basket. I put the cut key chain on the scissors so I could easily find it in the basket which if I know me will be a mess.


This was a suggestion right from the book. Use a "mint" tin, pre-wind bobbins with some of the major colors of your fabric, add needles and I included a needle threader (white thing). I also used a bit of scotch tape to keep the threads in place on the bobbins since within a few minutes they were unwinding and tangling.


I had these really cute colored paper clips which I intended to use. The cylinder looking thing are actually 4 disc shaped strong magnets I thought would be great for rounding-up all the loose paper clips.


Now on to the fast, fast part. This is one of two pieces of snow dyes that Nienke sent me quite a while ago. She actually sent me 3 but I am just using these 2 in the project. I also kind of like knowing a friend's hand dyed fabric is in my quilt. First I measured the fabric templates below. One was 2.5" and one was 2.25" so I decided to cut all the strips 2.5" for simplicity sake.


First I "got" why they included these "fabric cutting patterns" that have a 1/4" seam allowance. Cut them out, Beth


For the "square" pieces, it was easier to just use this easy plastic ruler that had squares printed on it.


I cut out the paper shapes and placed the clear ruler down to hold them in place while I used the stiff straight edge of the ruler to cut with. (lesson 1) On the first cut I shaved off a small sliver of paper. (thought) how long will it take me to whittle away the entire diamond???? Then I started to cut with the paper piece free hand - no ruler. This actually worked out great. Then  I decided before any accidental cuts destroyed the paper template, to cut it out of heavy box board.


I liked this a lot. I continued to cut strips and shapes (trying to cut equal numbers of the square and the diamond). I'm going to say I have about 15-20 different fabrics but I did limit myself to greens. I am saving Nienke's purple for later. I want to create each 4 part unit using 4 different fabrics but stick with the greens for now.


This may not look like much to you but I'm willing to bet there are over 200 pieces in the basket. (lesson 2) Panic has set in since I only have a little over 100 pieces of plastic template. Also (lesson 3), I wonder if Brandy has a Plexiglas diamond with seam allowance I can cut with. Back to the website....